
From Timber to Art Studio: Building a Garden Art Studio from a Log Cabin Kit
- Mar 30
- 7 min read
After five years of working in a small 65 sq ft spare room — and storing materials in my wonky 1960s caravan — my studio arrived.
Not as a finished space, but in pieces.
A huge stack of timber, wrapped in bundles.
The quiet anticipation of something about to take shape.

When It Arrives as Material
The log cabin studio took around eight weeks from ordering to delivery — although we delayed it slightly to give ourselves time to prepare the base.
It arrived on a lorry as a single wrapped bundle, sealed in plastic so it could be left outside until we were ready.
Even so, nothing quite prepares you for the scale of it.
Some of the logs were eighteen feet long.
The whole delivery took up most of the driveway.
It took us the best part of a day to unpack everything, carry it through to the garden, and organise it into something that felt manageable — only to cover it all again and begin building the following morning.
At this stage, it isn’t a studio.
It’s material.
And there’s something very grounding about that.

Learning the Kit
The instructions were clear, with links to video tutorials, but there’s still a level of interpretation required.
Some measuring.
Some stepping back.
Some figuring things out as you go.
Because of the scale of the cabin, materials were stacked in layers — and often the piece we needed next was buried somewhere underneath.
So it became a rhythm of:
build a little → pause → search → shift → continue.
If I were doing it again, I would spend more time at the beginning fully organising the timber into sections before starting.
It would save time later, and allow the build to flow more easily.
The Base: The Part That Holds Everything
Before any of this, though, came the base.
And this was, without question, the most important part of the entire process.
It took around 8–10 weeks in total.
The ground was dug out by my husband with a digging spade and levelled by hand using a landscaping rake. Then membrane, a thick layer of Type 1 aggregate and then compacted with a vibrating plate. On top of that, we installed a plastic grid system and filled it with gravel.
The cost for making the base came to around £1600 for materials — all labour done ourselves.
It’s the part you don’t see once the studio is built,
but it’s the part that determines how long it will last.
Drainage, airflow, stability — it all begins here.
You can read more about how we built the base in an earlier post [here].

Building, Board by Board
Once we started building, everything moved quickly.
There were two of us — myself and my husband — and over five days the structure came together.
• Day one: walls up, windows in
• Day two: roof purlins and roof boards, covered temporarily
• Day three: fitting the doors, finishing the tongue-and-groove roof (the most time-consuming part)
• Day four: installing the rubber roof
• Day five: adding the guttering, gable ends and painting
• Day six: continuing painting
The kit itself is well designed — all screws were supplied — but you do need the right tools to make it work smoothly:
• spirit level
• rubber mallet
• screwdriver
• step ladders and hop-ups
• and a taller ladder for laying the roof
One of the biggest surprises was just how much of the ground work you can actually do yourself with the right tools.
Investing in a solid steel landscaping rake, a large, sturdy wheelbarrow, and hiring a vibrating plate made a huge difference — especially when preparing the base.
That said, the physical scale of the build is something to really consider.
Some of the logs were 14–18ft long, and moving them into place takes two people.
It’s physical work, moving the logs from the drive to the garden was that most physical part, the buidling was relatively easy — and something that would be significantly easier with a smaller structure.
One part that caught us off guard slightly was the doors.
They were incredibly heavy — much more so than we expected — and needed assembling flat on the ground before being lifted into place.
You really need a good amount of clear, level space to do this properly, as the frame has to be joined accurately before it can be fitted. Then hanging them took a lot of jiggery and pokery (there is still some planing to do).
It’s one of those stages where you need to take your time.
Looking back, I’d say this is something to plan for — both in terms of space and having an extra pair of hands if needed.
Another part that’s worth planning for is storage.
Because the timber arrives untreated, you don’t want it exposed to the elements for too long.
We were lucky to have an empty 24ft garage where we could store the floorboards, windows and doors while we built.
Without that, it would have been much more challenging — especially with the unpredictability of the weather.
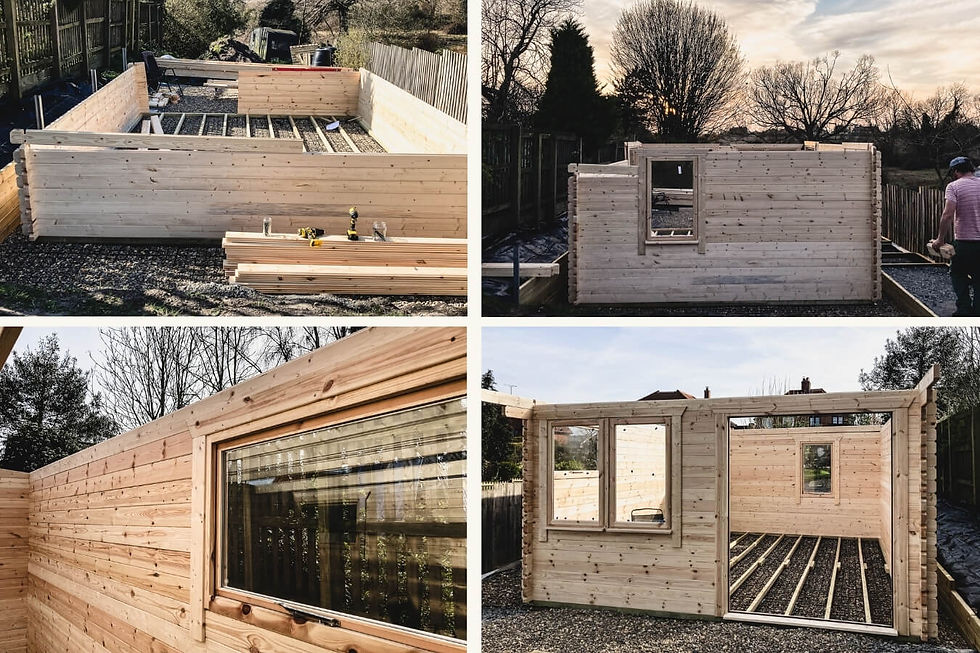

Windows, Light, and the View
The windows arrived pre-made, double glazed, with rubber seals — and as soon as they went in, everything changed.
Light began to move through the space in a way I could finally understand.
The studio faces west, but I added windows on multiple sides to soften and balance the light throughout the day.
Standing inside at this stage — before insulation, before cladding — felt important.
Just being there.
Watching how the light shifted.
Looking out at the garden, the trees, the changing sky.
Light is the single most important consideration in a space like this.
Without enough of it, these cabins can feel dark.
With too much direct sun, they can become unbearably hot.
Finding that balance is everything.
We’re planning to add roof lights designed specifically for wooden garden buildings, which will bring in softer northern light — something I’ve always been drawn to in a studio space.


A Shift in Colour
For a long time, I imagined this studio would be black.
I’d painted our other outbuildings that way, inspired by the huts along Walberswick harbour — and I loved how they receded into the landscape.
But somewhere in the process, that began to shift.
I found myself drawn to something softer.
More rooted.
In the end, I chose Little Greene Paint Company ‘Elysian Ground’ — a National Trust colour with a beautiful story.
Originally used in the 18th century as a backdrop in the Elysian Fields at Stowe, it carries a richness that changes with the light — sometimes green, sometimes almost brown.
Something closer to soil.
To bark.
To the tones already present in the garden.
We used an exterior intelligent eggshell and applied the first coat directly onto the bare wood — no primer needed.
Even after just one coat, it feels completely right.
The studio has softened.
Settled.
It no longer feels placed there — but part of the landscape itself.

Timing the painting was also something we had to be mindful of.
The ideal temperature for painting exterior wood sits between around 10°C and 25°C, allowing the paint to adhere and cure properly. While some paints can be applied at slightly lower temperatures, you should also avoid painting if there is a risk of rain or frost. We were really fortunate to have a run of dry, mild days in March, which made it possible to get the first coat on.
I’ve painted outbuildings in the height of summer before, and the heat can make the paint almost unworkable — thick and difficult to apply.
In the UK, spring or early autumn feels like the most forgiving time to do this kind of work.

Before the Inside Begins
There’s a brief moment in a build that’s easy to overlook.
Before insulation.
Before the walls are closed in.
At this stage, the structure is open.
You can see everything.
The temperature shifts with the air outside.
The sounds of the garden move straight through the space.
It feels raw, but also incredibly honest.
I wanted to spend time here before moving on — to understand the space fully before shaping the interior.

Why We Chose a Log Cabin
There are many ways to build a garden art studio, but for us, this came down to a balance between cost and trust in the materials.
This bespoke log cabin from Powersheds came in at just over £5000
In comparison, we were quoted over £25,000 for a bespoke building.
It felt like the most achievable way to create the studio and is guaranteed for 10 years and with proper maintenance — painted every 5–7 years, with good drainage and airflow — there’s no reason this structure won’t last for decades to come.
The rubber roof, the timber quality, the base, and joiner made timber doors and windows with toughened double glazing will all play a part in that longevity. For anyone considering a studio build in the UK, balancing cost, materials, and long-term durability becomes a big part of the decision.

A Studio, Slowly Becoming
Now, with the structure complete and the first coat of paint on, it’s beginning to feel like a place I can work.
We’re now moving into the next stage — insulating, cladding the interior, and installing the electrics — slowly turning it from a structure into a working studio.
There’s still more to do.
The slow work of making it a place I can return to each day.
A rhythm to establish.
But something has shifted.
What arrived in pieces is becoming a place to create.

This Is Part of a Longer Story
This post is part of a longer series documenting the building of my garden art studio here on the Suffolk coast — from the first plans through to the finished space.
Next, I’ll be insulating, cladding and painting the inside of the studio and then moving everything from my current studio into this one — deciding what comes with me, what doesn’t, and how the space begins to function as a place of work.


Comments